Live CD on an USB Stick (32-bit EFI, 64-bit Linux)
A friend of mine is using his old MacBook Pro from the year 2006 up to this date (December 2019).
Unfortunately he gets an error message from his banking website, that his Firefox browser is to
old and a security risk. It is actually the only website, that is complaining. I like the idea
of protecting the environment by using everything quite long (last MacBook Pro of mine was 2010-2018,
current is a used one from 2012).One idea was to give him another more up to date browser for his MacOS X Lion, but nothing worked. Then I though about using an Live CD. But the newest, that I was able to boot and had lying around was Ubuntu 12.04. I burned quite a lot DVDs but I did not recognize that his DVD drive stopped working along the way. Then after some reading on the reFind website I figured out, that everything is related to the 32-bit EFI bootloader, that is needed. The Linux itself can then be a 64-bit version.
Then I stumbled across the website of Matt Gadient. He offered some Linux images, that are 64-bit versions but a few bytes in the bootloader are changed, so that the old Macs grab the 32-bit EFI loader. To quote him on the Mac models:
Before reading further: Make sure you’re in the same boat!
These tend to be all of the Core2Duo models from late 2006. More specifically:
Matts page is quite long - especially caused by comments. To sum it up: The broken DVD drive seems to be quite common. Matt mostly suggests using an external CD drive or to remove the harddisk, install a Linux with another PC on it and put it back. But then I found one really interesting comment, that mainly consisted of a link to a very cryptic PDF on how to boot these Macs with a USB Live Linux Stick. After a lot of hours I found a reproduceable way to make such a stick in just 10 minutes. I tested it with
lubuntu-18.04.5-desktop-amd64.iso
(unmodified version from Ubuntu server)
which worked very good and with some Manjaro, which didn't work. So, here are the steps ...
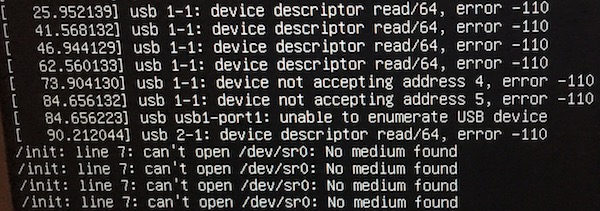
- Grab a USB stick that is not to cheap, otherwise you might end with an error like this:
 - Start a Linux distro of your choice (e.g. Manjaro 18.1.3) on another PC
- Start a terminal and type
lsblk
- Plug in your USB stick without any important data (All will be lost!) and type
lsblk
again and compare it to the last output. The difference between the outputs are caused by
the newly inserted stick. Mine is called sdb
and so all the following commands are based on that expression. It is extremly (!) important, that you alter all of my commands written here appropriately if you have another drive expression than
sdb to not accidently overwrite your other sticks and harddrives
currently installed!
- Start a Terminal and type:
sudo dd if=/dev/zero of=/dev/sdb
and quit this process after about 10 seconds by pressing Ctrl+C a few times. This process
completely erases all partitions and the boot-record on the stick.- Now we have to give the whole stick the "Master Boot Record" (
MBR/msdos)
format:
sudo fdisk /dev/sdb
o
w
- Next we are going to put a small EFI boot partition on the stick:
o
w
sudo fdisk /dev/sdb
n
p
1
2048
+36M
w
Now think about for a short while: What will be the largest Linux Live ISO, that you
will put on this stick. I will only use Lubuntu, which is about 1.1 GB, so (on
my small 2 GB stick) 1700MB is enough for me. If you want more space and have a
larger Stick you might want to replace the 1700 in the next section.
n
p
1
2048
+36M
w
- We are going to change the first partition to a real EFI-boot partition and make another partition for the Lubuntu:
sudo fdisk /dev/sdb
t
ef
n
p
2
75776
+1700M
a
1
w
- Start the Programm GParted t
ef
n
p
2
75776
+1700M
a
1
w
- Click GParted - Refresh devices
- Click GParted - Devices - /dev/sdb
- Right-click first partition - Format as - FAT32
- Click on the "Apply all operations" checkmark
- We have to mount the drive manually, because Linux does not mount the EFI partition type automatically:
mkdir /tmp/sdb1
sudo mount -o rw /dev/sdb1 /tmp/sdb1
- The fastest way to create some nested folders:
sudo mount -o rw /dev/sdb1 /tmp/sdb1
sudo mkdir -p /tmp/sdb1/boot/grub/
sudo mkdir -p /tmp/sdb1/efi/boot/
- Now we tell the GRUB bootloader to search for the sudo mkdir -p /tmp/sdb1/efi/boot/
loopback.cfg which will start the
real Linux kernel:
sudo nano /tmp/sdb1/boot/grub/grub.cfg
- Copy the following lines into the nano-editor, that just opened:
search --file --set=root /boot/grub/loopback.cfg
configfile /boot/grub/loopback.cfg
- Now quit it with Ctrl+X and write changes. configfile /boot/grub/loopback.cfg
- Download https://github.com/jfwells/linux-asus-t100ta/blob/master/boot/bootia32.efi
manually or
wget https://github.com/jfwells/linux-asus-t100ta/raw/master/boot/bootia32.efi- Copy this file from your download folder and unmount the drive:
sudo cp /home/stefan/Downloads/bootia32.efi /tmp/sdb1/efi/boot/
sync
sudo umount /tmp/sdb1
- Put the ISO image on the second partition of the stick:
sync
sudo umount /tmp/sdb1
sudo dd if=/path/to/lubuntu.iso of=/dev/sdb2 bs=1M
Testing the Stick
- Put it into the USB of the old Mac- Switch it on with the Power button and immediately afterwards, press and hold the Alt-Key until 2 drives appear on a grey screen
- Select the EFI and press Enter
- Now it takes a minute until a menu appears with "Try Ubuntu ..." - Press the key e
- A very basic editor opens with 2 important words on the screen:
quiet splashThese are bootoptions. There are lots of them and using a search machine should reveal a site, that is as helpfull as my german page. Most of the times I used:
quiet nomodeset nosplash
If you have plenty of ram (>=3 GB) you could load the whole stick to RAM and eject the
stick it after the Linux has started:
quiet nomodeset toram nosplash
Steve from the comments has a Mac Pro and needed to add noefi parameter:
quiet nomodeset noefi nosplash
Ommiting the quiet might give you more information where system hangs
at booting.- Press fn+F10
- Wait for some minutes
Some hints for Installing the Linux
I have never tried to actually install the Linux but at least
5 people succeeded. To sum up important conclusions from the comments:- Kim mentions, that it is very important to have a working LAN connection to install updates during install. A USB network adapter is useful here.
Troubleshooting
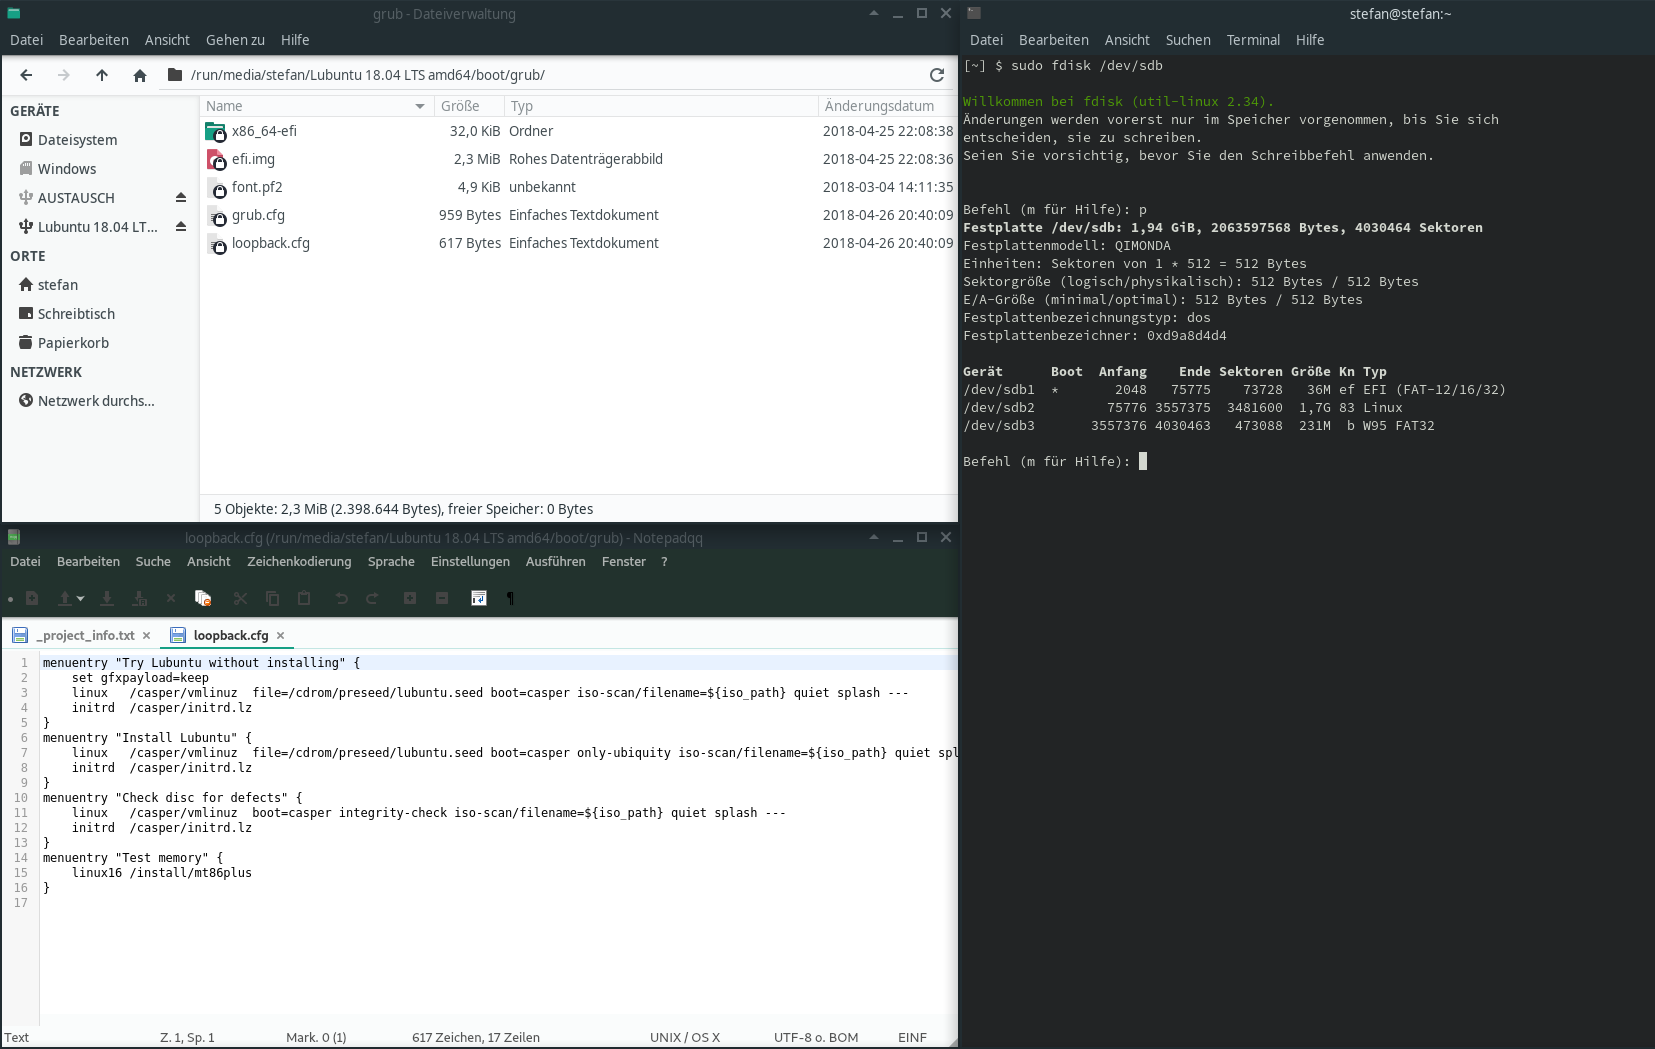
- If no boot drive or GRUB menu shows up: Try using another USB-stick.- In the end it should look like two those 2 pictures:

 Ignore partition 3 in this picture, it is only for exchanging data.
If you are trying to use non-Ubuntu based distros they might not have
loopback.cfg in the folder /boot/grub/ and so your
just with nano created grub.cfg might point into nowhere.
Some hints for my german fellows
# Deutsche Tastatur Rechtsklick Taskleiste
Add ... Panelitems
Add
Keyboard layout handler
Add
Close
Rechtsclick Amerikanische Fahne
Keyboard ... Settings
Häckchen weg "Keep system layouts"
Add german
# Aktuellster Firefox
Die nachfolgende Zeile über Edit - Copy kopieren
sudo apt update && sudo apt install firefox
Start - System Tools - LX Terminal - Rechtsklick - Paste
# Werbeblocker
Firefox - Hamburger - ublock in Suchfeld - Add ...